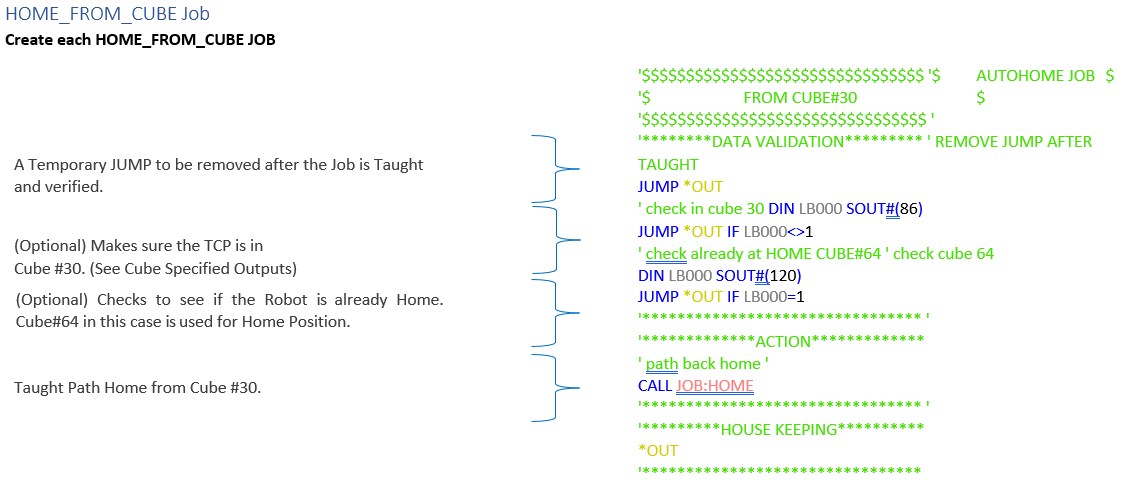
Auto Home Recovery
Introduction
People sometimes assume that since a robot made its way to a position, the robot remembers how it got there and can easily return home. This is not the case. The robot is taught how to get somewhere from its starting position (Home) but must also be taught how to return to its Home position. Even if the robot did remember its path and could just reverse it to get back Home, many times things have changed along its journey. For example, gripper clamped/unclamped, parts welded together, fixture clamps moved, etc., that make it impossible to return Home the way it came.
Due to robotic systems being different, sometimes an automated return-to home, “AutoHome” is easy to develop. Other times it is not so easy, seemingly impossible, can take many hours to develop, and still not be 100% reliable. However sometimes, AutoHome must still be done. This is because it can reduce downtime by allowing the operator to simply press a button prompting the robot to return to the Home Position. The operator can then fix any issues within the cell, then restart the system with minimal training and time lost.
This document presents two different approaches to solve the AutoHome problem. Testing and implementation can still be time consuming and not 100% reliable, due to the multitude of scenarios that must be accounted for. No matter how hard the programmer tries some scenarios may be missed. Or sometimes the system is modified and the needed changes to the AutoHome routine are overlooked. These mistakes usually result in a crash.
Auto Home Method 1
This document explains how the job works and setup procedures that need to be completed before using job (including possible Job edits)
Each highlighted section refers to different axis yellow-X, green-Y, and blue-Z. User may not need all or multiple axes in job (unnecessary axes can be removed from job). The application and surrounding equipment should identify which axes are needed for the job. You may need multiple jobs or replace the range values and/or SETE value to variables to make the job versatile.
- In many applications, a single axis of motion could clear the robot from area. Remove unnecessary axis section(s) from job.
- In some applications, multiple single axis (x, y, and/or z) moves may be required to clear robot. If this is the case, a rearrangement of the order (x, y, and/or z) may be required to move robot safely. A MOVL LP000 instruction will need to be added after each SETE instruction to preform single axis motion.
Setup required:
If equipment is not parallel or perpendicular to robot, user frame may be needed to simplify axis motion. CNVRT instruction will be needed in job below line 005. Changing LP000 from robot frame to UF. Instruction should read as follows: CNVRT LPX000 LPX000 UF#(x). Replace x with User frame setup for equipment. A variable can be used if the job needed to assign UF.
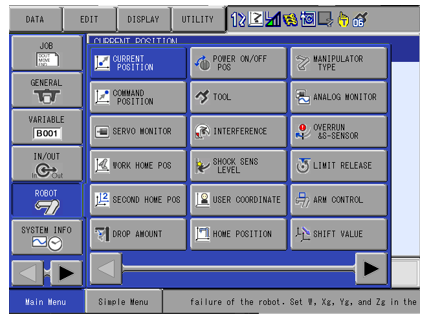
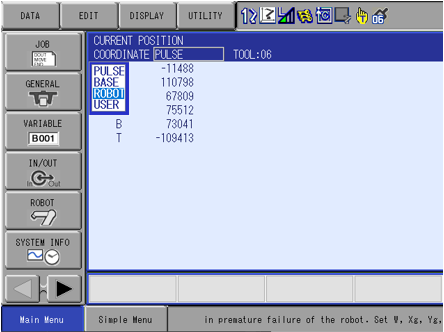
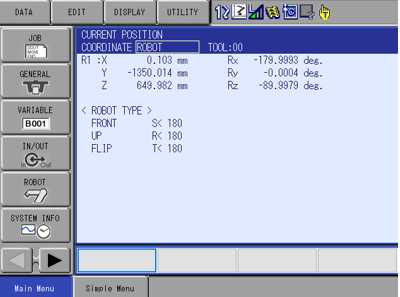
User will need to position robot in “safe” location using correct tool file. Review robot current position in robot frame or assigned user frame for equipment. To view Current position on standard pendant, select CURRENT POSITION in ROBOT section.
Change coordinate to robot or specific user frame being used.
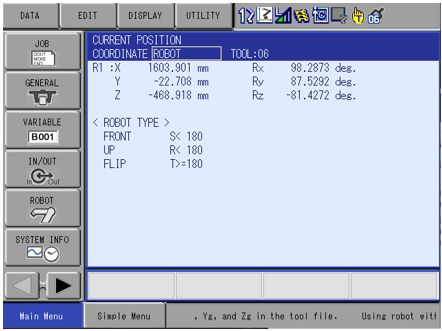
Make note of required axes to relocate robot (x, Y, and/or z). The axis location will be needed to reference range and SETE instruction value(s).
The IFTHEN instruction values will need to be edited to accommodate for robot range (+/-) to determine location for new motion. SETE instruction will need to be edited with value of axis in “safe” position. User can change range to single value is desired. The new instruction would read: IFTHENEXP LDxxx<>100000 instead of IFTHENEXP LDxxx<100000. Xxx to be replaced with correct variable for axis.
The values of IFTHEN, GETE, and SETE instructions are in microns(100mm=100000). D variables can be used to set range and SETE instructions. Using variable still requires values of D variable in microns(100mm=100000)
The final position can be taught point or variable to get robot to home or pounce position. This position should outside/away from equipment.
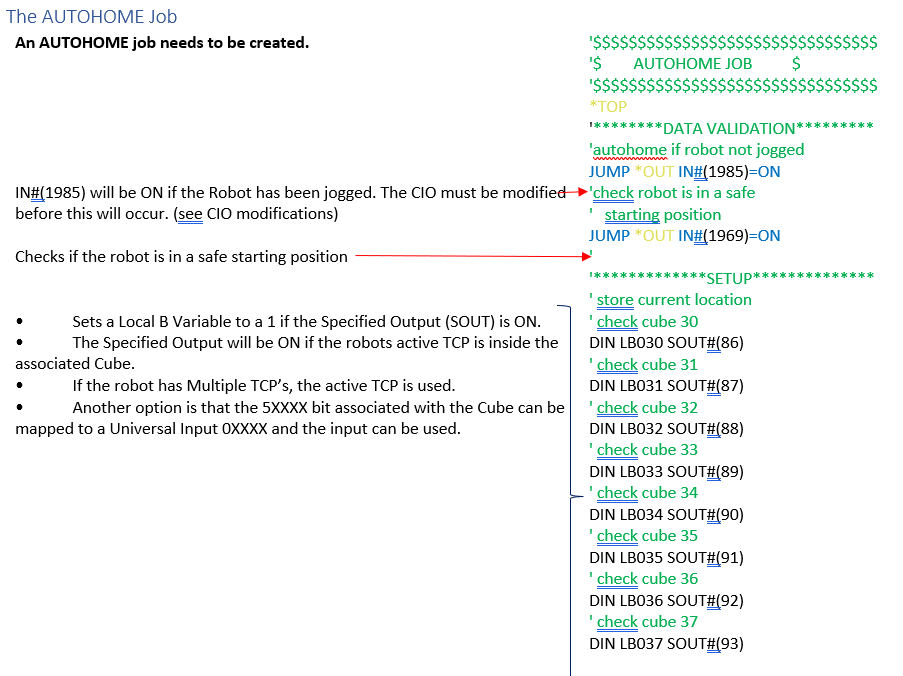
Recover_Home job contents:
000 NOP
001 'Safely get the robot back home
002 ' get robot frame current pos
003 GETS LPX000 $PX001
004 ' get robot current X pos
005 GETE LD001 LP000 (1)
006 ' confirm robot X position
007 IFTHENEXP LD001<100000
008 ' set robot X
009 SETE LP000 (1) 100000
010 ENDIF
011 ' get robot current Y pos
012 GETE LD002 LP000 (2)
013 ' confirm robot Y
014 IFTHENEXP LD002<100000
015 ' set robot Y
016 SETE LP000 (2) 100000
017 ENDIF
018 ' get robot current Z pos
019 GETE LD003 LP000 (3)
020 ' confirm robot height
021 IFTHENEXP LD003<100000
022 ' set robot height
023 SETE LP000 (3) 100000
024 ENDIF
025 ' move to clear position
026 MOVL LP000 V=150.0
027 '
028 'Move to Home
029 MOVJ P000 VJ=10.00
030 END
Example of use
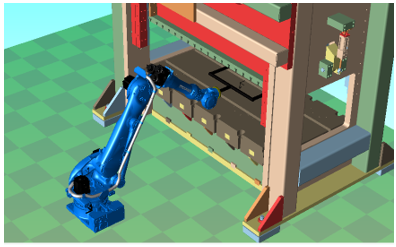
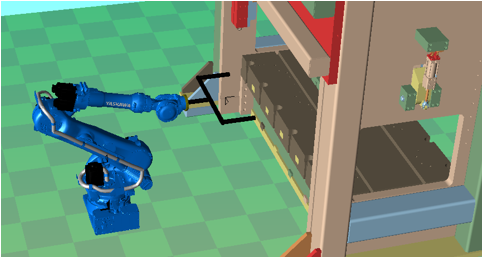
Scenario: Robot is in press and must be removed safely
Setup Procedure
- Set TCP for tooling as needed for application. (NOTE: Incorrect TCP will give incorrect position of robot, leaving opportunity for crash.)
- Jog robot to “safe” position outside of equipment with correct TCP.
- Log robot current robot frame position from controller. This information will be used to edit the job.
- In current scenario, robot will need to first move up then move out of press.
- Edited job should be as follows:
000 NOP
001 'Safely get the robot back home
002 ' get robot current pos
003 GETS LPX000 $PX001
004 ' get robot frame current Z pos
005 GETE LD001 LP000 (3)
006 ' confirm robot Z position
007 IFTHENEXP LD003<650000
008 ' set robot Z
009 SETE LP000 (3) 650000
010 ' move to clear position
011 MOVL LP000 V=150.0
012 ENDIF
013 ' get robot current Y pos
014 GETE LD002 LP000 (2)
015 ' confirm robot Y
016 IFTHENEXP LD002<-1350000
017 ' set robot Y
018 SETE LP000 (2) -1350000
019 ' move to clear position
020 MOVL LP000 V=150.0
021 ENDIF
022 ' move to clear position
023 MOVL LP000 V=150.0
024 '
025 'Move to Home
026 MOVJ P000 VJ=10.00
027 END
Review of changes in scenario
- Moved Z section to beginning of job to move robot up first. (lines 006-012)
- Edited line 007 with Z value from “safe’ position Z 649.982 (rounded value to 650000 equaling 650.000mm)
- Edited line 009 to same value of 650000
- Add line 011 MOVL LP000 V=150.0 to move robot to designated height.
- Remove X section. (X is not required in scenario)
- Edit line 016 value from ‘safe” position Y -1350000(-1350.000mm)
- Edited line 018 to same value -1350000(-1350.000mm)
- Add line 020 MOVL LP000 V=150.0 to move robot out of press.
- Line 023 is redundant motion and can be removed, if desired.
- Line 026 moves robot to predefined “safe” or pounce position.
Auto Home Method 2
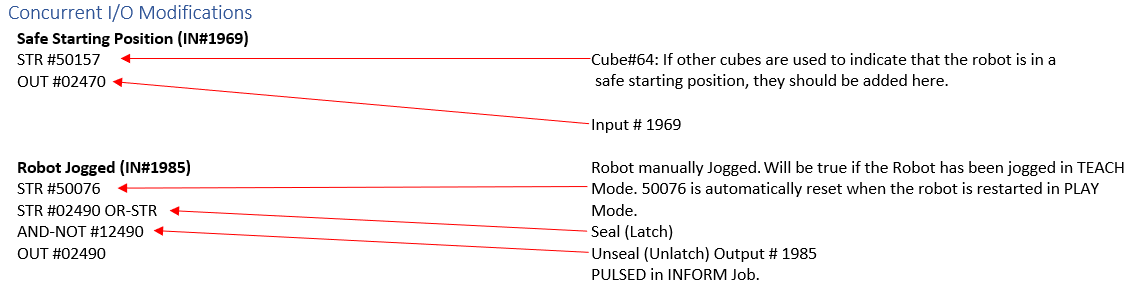
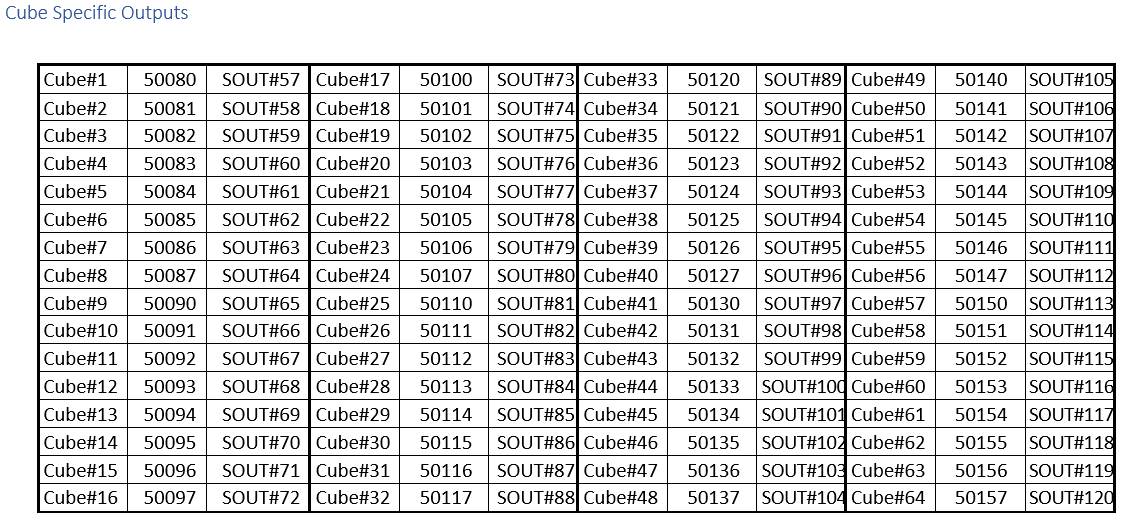
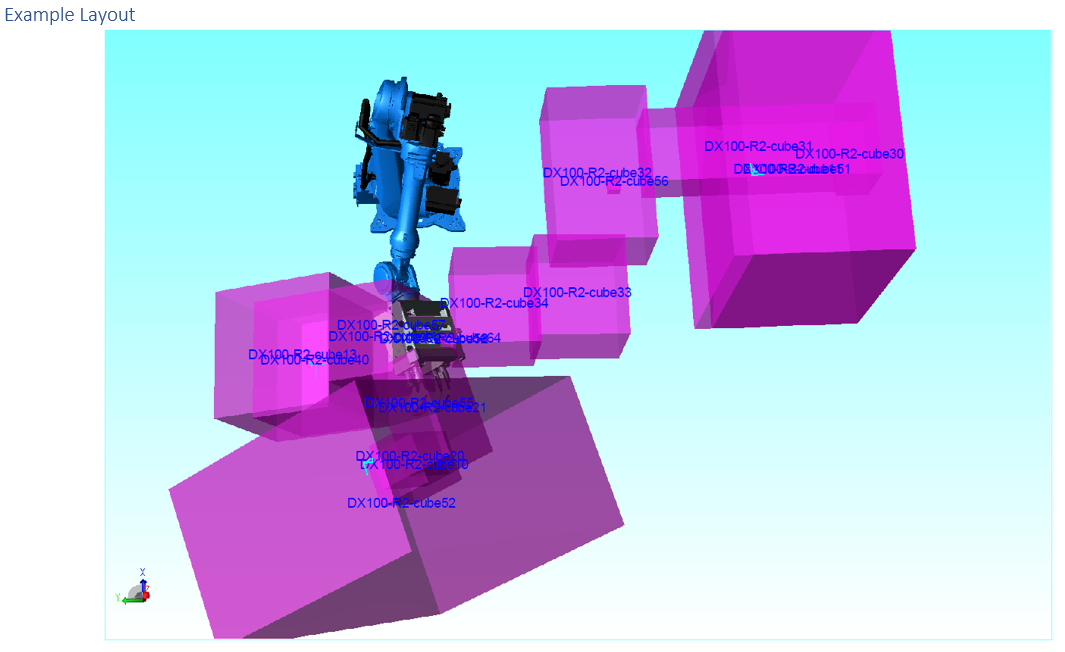
This “cube-based” method was taken from an existing project, so the examples have been used but will need modified for the system it is to be used on. Requirements include but are not limited to:
- Knowledge of using Cubes
- Concurrent I/O ladder changes
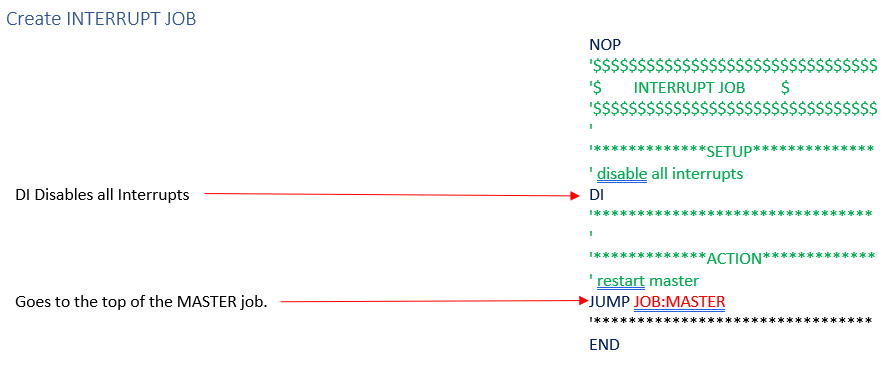
- Interrupt Job.
- A lot of testing
- A lot of time
What is the Interrupt Job?
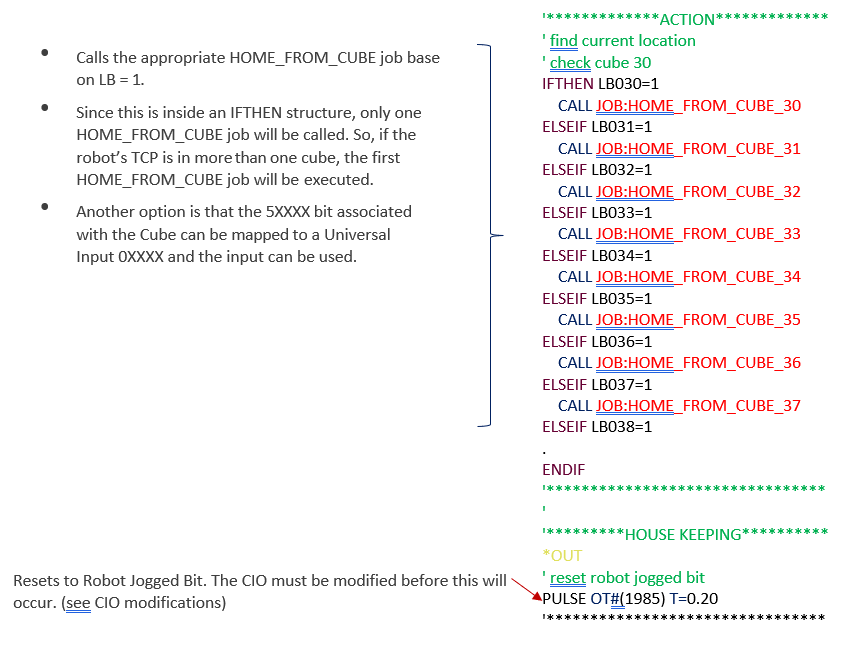
The interrupt job is a job that is automatically called and executed based on the status of an input signal. The job that was currently in progress is momentarily suspended. In the case of using AutoHome the Interrupt job restarts the MASTER job and does not return to the job in progress. (See Interrupt Job Manual)
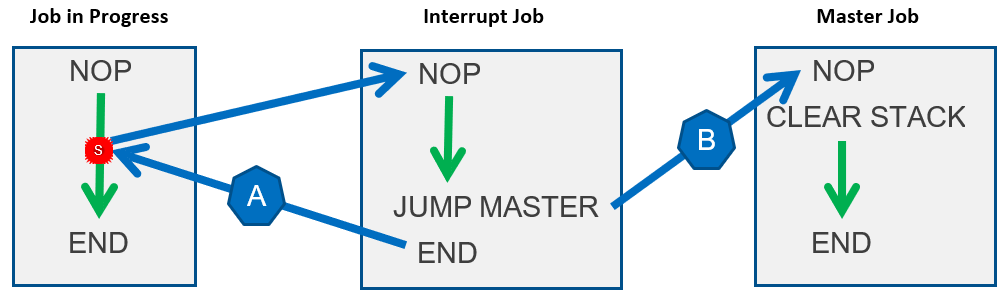
Path A: If the END of the INTERRUPT job is reached.
Path B: The AutoHome INTERRUPT job goes to the MASTER job before reaching the END.

Comments
0 comments
Please sign in to leave a comment.