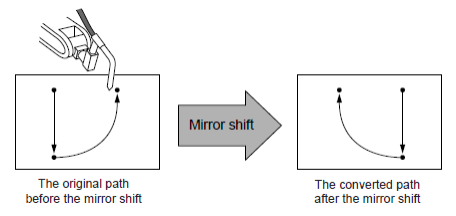
MIRROR SHIFT
When duplicate parts are being produced by both robots on both sides of the
positioner, or right and left parts are being produced, all of the jobs do not need to
be taught. Copies of the jobs may be used by other robots or may be used on the
opposite side of the positioner.
Mirror Shift
The MIRROR SHIFT utility produces a new job that is the mirror image of the
original job. All COMMAND POSITION points will shift to the opposite sign/side
of the specified reference for Pulse/RF/UF.
Mirror Shift on Pulse data
With the Pulse Mirror-Shift function, the mirror shift is performed by
reversing the sign (+/-) for the axes which are specified with the parameter
in advance.
The shifted axes are determined by S1CxG 065 according to the following bit pattern:
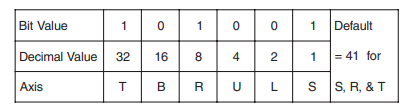
NOTE: The value of 41 is the default for a 6-axis robot, the value of 105 is the default for
a 7-axis robot.
In the above example, using 41 for this parameter, only the signs on the S, R, and T
axes will be reversed during the MIRROR SHIFT, and the signs on the other three
axes L, U, and B will not.
CAUTION! MIRROR SHIFT by Pulse data will shift the COMMAND POSITION of the
points but it does not guarantee that the tool orientation will be retained.
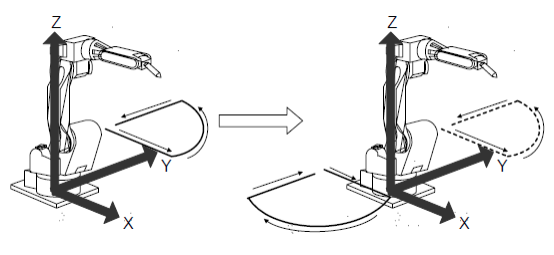
Mirror Shift on Robot Frame X-Z Plane
Mirror shift on RF data will mirror the job across the X-Z plane only. This shift
includes tool orientation reflected to the opposite side of the X-Z reference plane.
NOTE: With the Robot Frame mirror shift function, conversion for a Station Axis
is performed by reversing the sign for the axes specified with the parameter
S1CxG065 MIRROR SHIFT SIGN INVERSION. Mirror shift conversion for
the Base Axis is not performed with the RF mirror shift function.
Axis data is not controlled and may cause the creation of positions that the robot
cannot reach.
CAUTION! Points shifted out of the robot’s TCP working envelope or past motor soft limits
will be displayed in the job as “/OV” and must be modified. Do not play a job
until it has been tested with the FWD key.
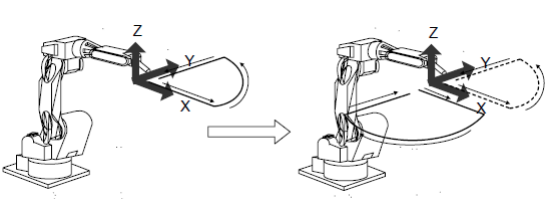
Mirror Shift on User Frame data
Mirror Shift can be based on the X-Z, X-Y, or Y-Z plane of any USER FRAME.
The desired UF#( ) must be created before the Mirror Shift is performed.
To perform a Mirror Shift on a job:
In TEACH, from the JOB CONTENT, choose UTILITY.
Choose MIRROR SHIFT
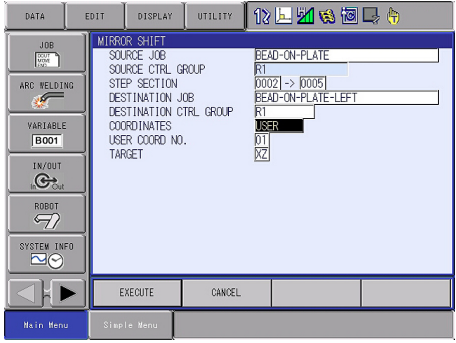
Cursor to SOURCE JOB, press SELECT.
Cursor to desired job name; press SELECT.
Cursor to Step Section and identify the first and last steps in the job that will be
mirrored.
Cursor to DESTINATION JOB; press SELECT. The source job title appears on
the Results line.
Completely rename the job, or change the original job name; press ENTER.
Cursor to DESTINATION CONTROL GROUP; press SELECT. Available
control groups will appear such as R1, R1+S1, R1+R2, etc. Cursor to the desired
control group; press SELECT.
Cursor to and choose the coordinates for the mirror shift.
For Robot choose the desired Target (XZ, YZ, or XY).
or
For User choose the User Coord No and the desired Target (XZ, YZ, or XY).
Choose EXEC.
Same Job to the Second Robot
If the same parts are desired on the same side of the fixture, jobs can be easily
duplicated. In this situation, a JOB COPY is performed from the JOB CONTENT
screen or from the JOB LIST. This originally keeps the Control Group the same for
both jobs.
In order to shift the job from R1 to R2 (or vice versa), in the DISPLAY menu of the
JOB CONTENT screen, SELECT the JOB HEADER. The JOB HEADER includes
the indication of the existing CONTROL GROUP
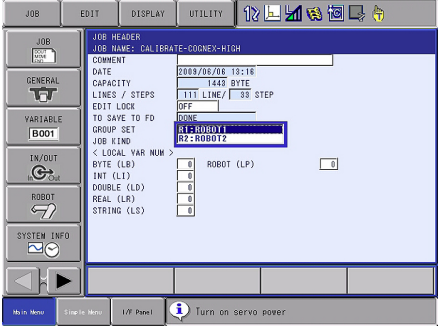
Cursor to and SELECT to access the other CONTROL GROUP selections. If the
original is for R1, only R1 or R2 may be selected. There will be no other selections if
the job is only for S1.
NOTE: When more than 2 groups are permitted in a job (eg. R1+R2+S1) this function
cannot be performed.
Job Duplication to Other Side of the Fixture, Single Motor RM Positioner
A Side-A R1+S1 job can be used on Side-B of the fixture. Since there is no indication
about what side of the positioner the job is constructed, naming and/or commenting is
essential.
To shift a job to the other side of the positioner, External Axis (or Station Axis)
position is required. The Home position on side A and on side B are accessible
through the External Position Variables.
Home position for Side A is normally in address EX 040. Home position for Side B
is normally EX 041. The difference between these two positions is the amount the
job will have to be shifted. For this example, a “200000” pulse count difference is
used between the two variables.
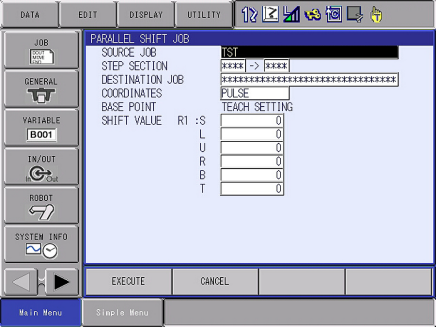
The PARALLEL SHIFT function found in UTILITY in the JOB CONTENT screen
allows the shifting of a job based on external axis pulse counts. Simply take the
copied job, PULSE coordinates, with the “200000” set in the S1 location.
Execution will take the job to the opposite side of the fixture. Of course, always step
through and Test Start any job that has been edited. Failure to test the jobs could
cause the system to crash!
Job Duplication to Other Side of the Fixture, Three
-Motor RM positioner
On a three-motor RM positioner, the S1 motor is the SWEEP, the S2 motor is the
Side-A, and the S3 motor is the Side-B. Moving a job to the opposite side requires
only identifying the CONTROL GROUP in the JOB HEADER.
If the Job is an R1+S1 and needs to become an R1+S2, perform the following
keystrokes:
From the Job Content screen, choose Display in the Menu Area.
Cursor to Control Group R1+S1 and press SELECT.
Cursor to R1+S2 and press SELECT.
The Job is now defined as an R1+S2 job and will run on the B Side.
Comments
0 comments
Please sign in to leave a comment.