Dynamic Editing ( PAM)
It is possible on the DX200 to edit steps in a program without going into Teach mode.
The PAM (Position Adjustment by Manual) function allows not only permanent shifting of
taught points and/or rotation in any XYZ Frame, but also changing the velocity of steps, or
modification of associated position levels while in the PLAY mode while the job is running or in
TEACH mode.
The changes become effective at the next NOP instruction of the selected job in PLAY mode or
immediately if in TEACH mode.
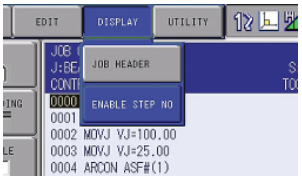
NOTE: If the step number for each desired change is unknown, activate the addresses for all
steps by choosing ENABLE STEP NO from the DISPLAY menu in the JOB CONTENT
screen.
The SETUP menu provides the Functional Condition Setting screen that sets maximum change
values for the PAM dynamic editing function.
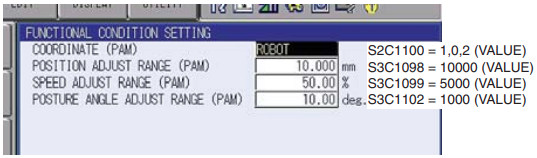
These are stored in the corresponding parameters as noted below.
NOTE: The shift amounts are relative to a coordinate system. The coordinate system options
are BASE, ROBOT, TOOL, and USER. The default coordinate system is stored in
S3C1100 (0=Base; 1=Robot; 2=Tool; 3 to 65=User 1-63.
NOTE: The default position changing range is ± 10 mm as defined in parameter S3C1098,
posture of ± 10 deg as defined in parameter S3C1102, and the speed changing range is
±50% as defined in parameter S3C1099. The POS LEVEL can only be modified in steps
that already have a PL set.
To use the PAM function in Play mode, perform the following procedure:
1. With the job executing in PLAY/AUTO, verify the STEP number (not LINE number) of
each step to be changed and what position adjustment or speed/POS LEVEL modifi cations
are desired.
2. From the JOB CONTENT screen, choose UTILITY.
3. Choose PAM.
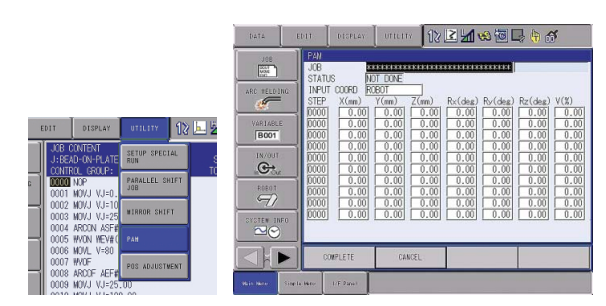
4. Cursor to JOB; press SELECT.
5. Cursor to desired job name; press SELECT.
6. Cursor to COORDINATE SYSTEM; press SELECT.
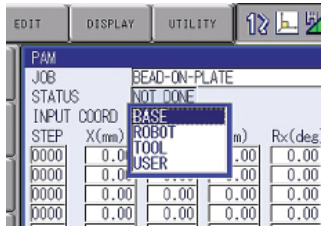
7. Cursor to the desired coordinate system; press SELECT. If USER is chosen, then enter the
User Frame number.
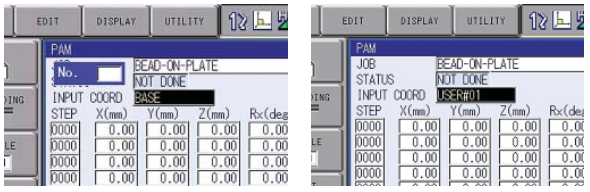
NOTE: Shift amount data will not be accepted on the PAM screen unless a STEP number has
been entered first.
8. Cursor to an entry line in the STEP column; press SELECT.
9. Enter a STEP number to be edited; press ENTER.
10. Repeat steps 8 and 9 for each STEP number to be edited.
NOTE: Up to 10 steps can be modified at a time.
11. Move the cursor to the direction, rotation, V (%), or PL column ; press SELECT.
12. Enter the appropriate data; press ENTER
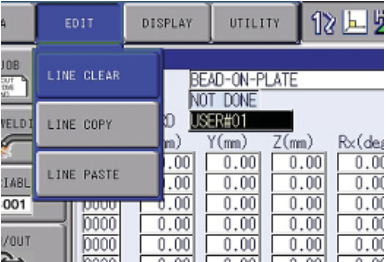
NOTE: EDIT allows access to LINE CLEAR (clears all data for that step), LINE COPY (copies
all data for that step), LINE PASTE (pastes all data copied from another step).
13. Repeat Steps 11 and 12 for each data change for up to 10 steps maximum.
14. When all changes have been entered, choose COMPLETE.
15. Choose “YES” on the “Correct?” screen.
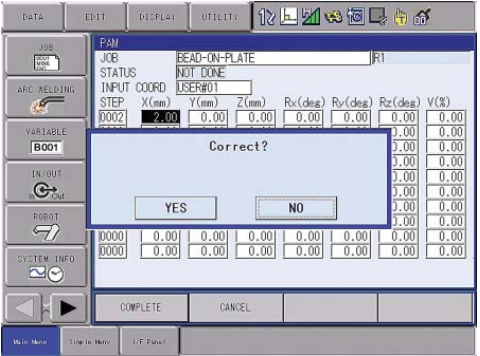
NOTE: In PLAY mode, the permanent changes will occur the next time the cursor is at NOP
during playback; in TEACH mode, the permanent changes to the selected job are done
immediately. Inserting additional NOP instructions throughout the job will allow quicker
reaction to the PAM execution.
If the changes made are undesirable, the UNDO becomes available in TEACH mode or if
stopped in PLAY mode. The UNDO feature is in the EDIT menu of the PAM function screen, as
shown in the figure.
To UNDO the previous PAM execution, perform the following:
1. In the PAM screen EDIT menu, choose UNDO.
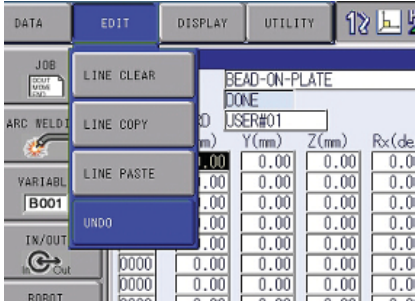
2. Choose YES on the “Undo?” dialog box

Comments
0 comments
Please sign in to leave a comment.