Function Overview:
To aid with product documentation and troubleshooting, the DX100 supports the screen capture function
which was originally deployed on the NX100 controller. The function allows capture of any display screen
while in either “Maintenance Mode” or normal operating mode. The file generated is created in a JPEG
format and stored to either the CF or USB flash drive dependent on which device is inserted (will autoselect as long a single media is loaded). The file is named in the following format: YEAR-MONTH-DAYHOUR-
MINUTES-SECONDS (example: 20081114083452).
Performing screen capture in normal operation mode:
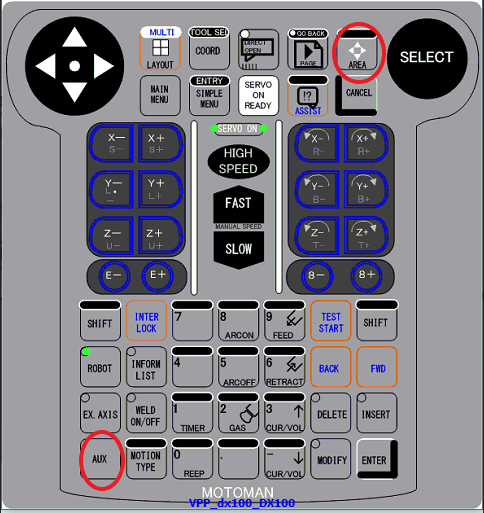
1) Apply power to the DX100 controller while pressing and holding the “AREA” + “AUX” keys. The
keys only need to be held until the first screen appears on the controller. Pressing and holding the
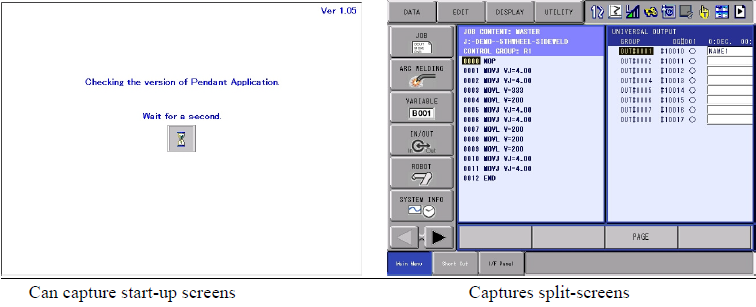
keys too long into the start-up sequence will result in screen captures of the start-up screens.
2) Upon booting the system, ensure that a CF card or USB drive is inserted in the pendant. The
controller automatically selects the media based on which drive is connected at the time of start-up
3) Navigate the screens until the desired screen is selected.
4) Once the desired screen is achieved, the capture function is enabled by again pressing “AUX” and
“AREA” buttons simultaneously for a brief instance.
5) Once the image has been stored on the selected drive, a pop-up message will appear stating that
“Print Screen Complete”. Close the message box to resume normal operation.
6) If another screen capture is desired, simply pressing the “AREA” and “AUX” buttons
simultaneously will cause the current screen to be captured and stored to the selected device.
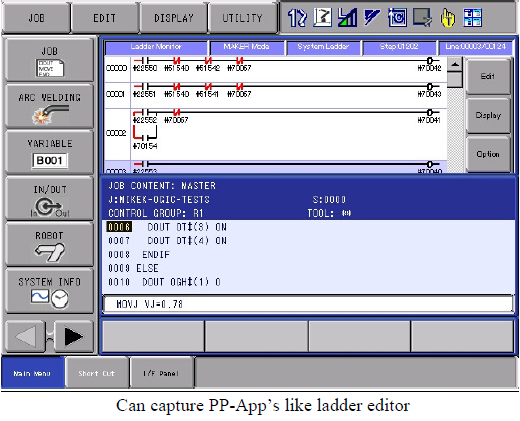
Sample screen captures:
Performing screen capture in maintenance mode:
1) With the controller off, set “S1” on the YIF01 board assembly to “7” to force the controller to boot
into maintenance mode at start-up
2) Apply power to the DX100 controller while pressing and holding the “AREA” + “AUX” keys. The
keys only need to be held until the first screen appears on the controller.

3) Upon booting the system, ensure that a CF card or USB drive inserted in the pendant. The
controller automatically selects the media based on which drive is connected at the time of start-up.
4) Navigate the screens until the desired screen is selected.
5) Once the desired screen is selected, the capture function is enabled by again pressing “AUX” and
“AREA” buttons simultaneously for a brief instance.
6) Once the image has been stored on the selected drive, a pop-up message will appear stating that
“Print Screen Complete”. Close the message box to resume normal operation.
7) If another screen capture is desired, simply pressing the “AREA” and “AUX” buttons
simultaneously will cause the current screen to be captured and stored to the selected device.
8) Once complete, turn off controller power and reset “S1” on the YIF01 board assembly to “0” to
ensure the system starts normally.
Sample screen captures:

Conclusion / notes:
The DX100 screen capture function operates in a similar fashion to the NX100 function, only it uses different buttons to save the image. Otherwise the function operates as would be expected. In the event that a USB or CF card is not loaded into the pendant and a capture is attempted, a message box will appear stating that no media is available.
Comments
0 comments
Please sign in to leave a comment.