Material Required: Battery 153198-1 / ER6VC3N-3.6V
The DX200 has a battery to back up the CMOS memory for the system. A battery alarm indicates that a battery has expired and must be replaced. The programming pendant will display the message "Memory battery weak" which will appear at the bottom of the display.
A CMOS backup is recommended before replacing the battery.
| For USB backup, turn off control power to the DX200. On the programming pendant, pull out the water resistant USB cover to gain access to the USB port. | |
| Insert the USB memory into the USB port. Make sure the orientation of the memory is correct. Do not force the stick into the port (it should slide in easily). | |
| While pressing the 'MAIN MENU' key, turn on control power to the DX200 to boot into Maintenance Mode. If the security mode is "OPERATION MODE", indicated by a single key, it will need to be changed to a higher level | |
| Select the 'SYSTEM' -> 'SECURITY' menu item. | |
| On the "SECURITY" screen, with the mode highlighted, press the 'SELECT' key. | |
| Highlight "EDITING MODE" and press the 'SELECT' key. | |
| Enter the editing mode password and press the 'ENTER' key. | |
| Verify that the mode is set to "EDITING MODE". | |
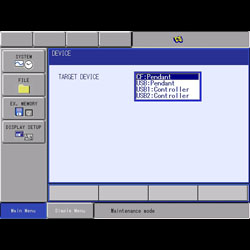
| Select the 'EX. MEMORY' -> 'DEVICE' menu item. | |
| Verify the target device is for the type of memory you are using to backup to. | |
| If the target device needs to be changed, press the 'SELECT' key, highlight the desired target device, and then press the 'SELECT' key again. |
 |
| Select the 'EX. MEMORY' -> 'SAVE' menu item. | |
| On the "SAVE" screen, with 'CMOS' highlighted, press the 'SELECT' key. | |
| Select the 'YES' button. | |
| If you are asked to overwrite an already existing backup, select the 'YES' button. If you want to keep your older backup, you should move it to a different directory or rename the file. | |
| During the save of the CMOS, a message will appear at the bottom of the pendant screen. | |
| After completion of the save, a beep will occur and the message at the bottom of the pendant screen returns to "Maintenance mode". | |
| Battery Replacement | |
|
WARNING: This procedure requires the door of the controller to be open with power on. High voltage is present inside the controller. Only trained/licensed personnel should perform this procedure. All local, state, and governing bodies regulations should be followed. Turn on power to the DX200 controller. |
|
| Locate the top door lock on the front left hand side of the controller door. Using a screwdriver, turn the lock counterclockwise 180 degrees. | |
| Locate the bottom door lock on the front left hand side of the controller door. Using a screwdriver, turn the lock counterclockwise 180 degrees. | |
| Open the door of the DX200 controller by pushing in the tab through the hole on the left side of the switch and pulling the door open. | |
| The battery is located on the YIF01 board of the CPU unit in the controller. | |
| The battery is located at the bottom of the YIF01 board. | |
| Loosen the Phillips screw on the battery connector security tab and slide tab to the right. | |
| Disconnect the CN110/BAT connector from the YIF01 board. | |
| Loosen the Phillips screw on the battery holder. | |
| Move the battery holder to the right and pull out to remove the battery holder from the YIF01 board. | |
| Remove the battery from the battery holder and replace with a new battery (153198-1). | |
| Install the battery and holder into the YIF01 board. | |
| Secure the battery holder with the Phillips screw. | |
| Connect the CNBAT connector to the YIF01 board. | |
| Slide the battery connector security tab over the battery connector and tighten the Phillips screw. | |
| Close the door of the DX200 controller by verifying the disconnect handle is in the ON position and pushing the door closed. | |
| Locate the bottom door lock on the front left hand side of the controller door. Using a screwdriver, turn the lock clockwise 180 degrees. |
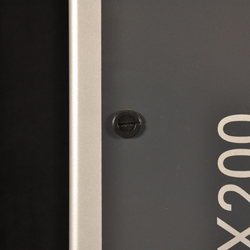 |
| Locate the top door lock on the front left hand side of the controller door. Using a screwdriver, turn the lock clockwise 180 degrees. |
Comments
0 comments
Please sign in to leave a comment.