The YRC1000 and YRC1000micro Controllers can be configured as either an Ethernet/IP Adapter or Scanner. Configuring the Controller as an Adapter allows a connection to be established to the Controller and is most often used to communicate with PLCs (e.g. see this article). Configuring the Controller as a Scanner allows it to communicate using EtherNet/IP to peripheral devices such as grippers and I/O modules. Multiple Scanners can be added to a single Controller.
This article will describe the basics for adding a new Scanner. This configuration can be done on Smart Pendant as long as EtherNet/IP has been enabled.
Configuration Information for Scanner
Before configuring, it is important to gather all the necessary information on the device. The table below shows the information needed to configure a Scanner. This information should be available from the device manufacturer or specification sheet. In addition, the IP Address for the device must be set to be on the same network as the Controller.
|
Name |
|
|
IP Address |
|
|
Input Size |
|
|
Output Size |
|
|
Configuration Size |
|
|
Input Instance |
|
|
Output Instance |
|
|
Configuration Instance |
Configure the Scanner using Smart Pendant
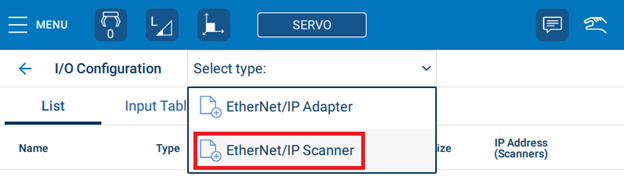
Now, the data gathered above can be entered. Using Smart Pendant, switch to Management security level and navigate to MENU->System Settings->I/O Configuration. To add a new Scanner, press the {NEW ALLOCATION} at the top of the screen and select EtherNet/IP Scanner:
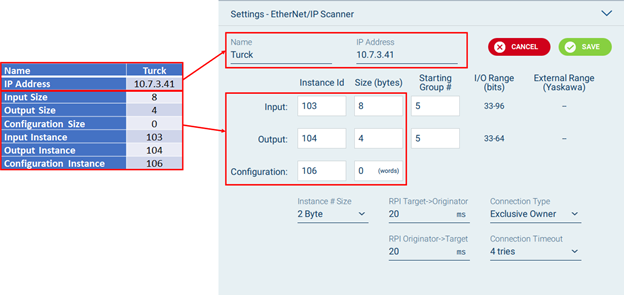
Next, the information from the table above can be entered in the Detailed Settings panel at the bottom of the screen. For example, below shows the information for a Turck FEN20-4DIN-4DXN I/O Module.
A few other settings that can be configured from this panel:
- Starting Group # - this will define the starting group for the Input/Output mappings. For example, in the above example this is set to Group #5 for both Input and Output. This corresponds to Inputs 33-96 and Outputs 33-64. So, to turn on the first output on the device, the Inform command “DigitalOut Output#(33) ON” could be executed. By default, Smart Pendant will choose a valid Starting Group# when the Size values are entered, but this can be changed to a different location.
- Instance # Size – This usually should not be changed; however, some older devices may not work unless this is set to 1 Byte.
- RPI/Connection – These settings should not be changed unless specified in instructions from device manufacturer.
Press {SAVE} to finalize the configuration and then reboot the Controller for the changes to take effect.
Comments
0 comments
Please sign in to leave a comment.