Introduction
This document provides an overview of three techniques for calling robot jobs based on signals from a PLC.
The scenario addressed here is one where we have a main INFORM job running on the controller. It is running in a loop, looking for a signal from the PLC indicating which job to run next, before returning to the main job.
Some have asked, “Can I control the robot without using INFORM?” The answer is, “yes”. It can be done using other environments such as our MLX300 product which allows you develop and execute all of your coding on a PLC, or ROS which moves the execution environment to a networked computer.
You will have to review the options and decide which works best for your situation.
For each of the examples here, we are assuming you have communications established between the controller and the PLC. Verify you can raise a signal on the PLC and see it change under the “IN/OUT, “GENERAL PURPOSE INPUT” screen on the pendant and vice versa.
CALL Job if Input is ON
First, you can place an “IF” condition on a CALL statement. This can be used to call a job based on the status of an input bit or input group. To do this, call up your list of INFORM commands from the pendant, select the “CONTROL” category. Select “CALL” and then press SELECT one more time to get to the detail edit screen for the CALL command. This will allow you to add an IF condition to the end of the CALL statement. In the example below, I have already set the IF condition to be “IF IN(1)=ON”. You can see the result in the red box at the bottom.
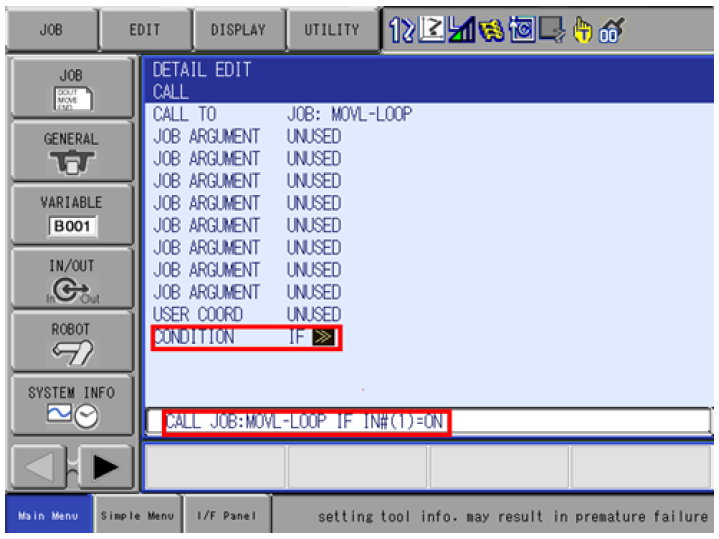 |
Using this technique, your Master job could have a series of “CALL JOB:x IF…” commands for the range of inputs you want to check. CALL JOB:ONINPUT1 IF IN#(1)=ON |
This technique is also supported to JUMP to another job. (Control is passed to the other job but does not return to the calling job when finished.) The syntax for this approach is: JUMP JOB:ONINPUT1 IF IN#(1)=ON
Jumps and goto’s are generally frowned upon in programming circles. They can make it difficult for others to follow the logic of your code. Jumping out of a “normal” flow of logic can also cause unpredictable results with the state of variables that might normally be set or zeroed out in the normal flow. However, there can be cases where it is the most elegant solution. For example, if some sort of process error occurs (not safety related) that would require you to abort the current run and start over, it may be best to jump to a “RESTART” job.
CALL (input value)
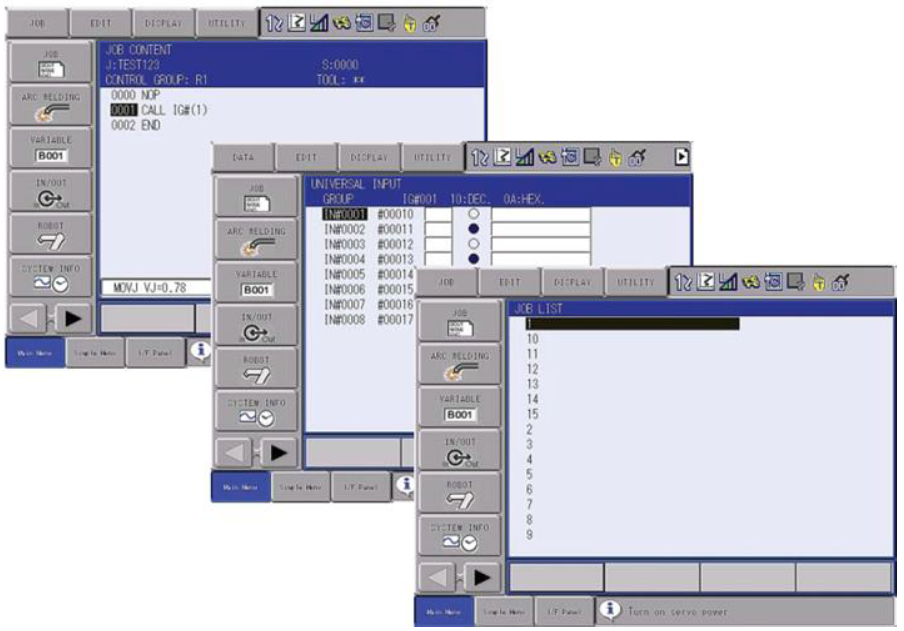
Another approach is to name your jobs, 1, 2, 3, 4, 5, 6, 7, 8 and then call them directly. The CALL command would look like: CALL IG#(1)
Note this uses an input GROUP, so a single command could call up to 255 different jobs. You will need to consider the ramifications of getting a signal with no associated job defined for it and program for this. A great visual of this from one of our training class manuals is shown below.
Like the previous example, you can also JUMP to a job associated with the value of an input group. Syntax: JUMP IG#(1)
Job Execution Table
In the previous example, you are “limited” to 255 potential jobs being called directly from one input group. To address this, we have the concept of a Job Execution Table (JET) table. You can define up to 3 JET tables, each with 1,024 entries. Each JET Table entry associates a job name with a number. This then allows you to reference a job by the table and number it is stored under. Using this technique, you could call the job listed in entry 459 of JET table 1 with the command: CALL JET#(1) ENTRY=459
You can also jump to a job (instead of calling) in the JET table and base your table and job selection on variable values, as shown below:
JUMP JET#D009) ENTRY=I099 IF LB000=0
CALL JET#(B004) ENTRY 20
NOTE: Parameter S2C443 enables the use of JET Registration tables.
- S2C443=0 – JET registration off
- S2C443=1 – Jet Registration Tables active only in TEACH mode
- S2C443=2 - Jet Registration Tables can be edited in PLAY mode, even when a job is running
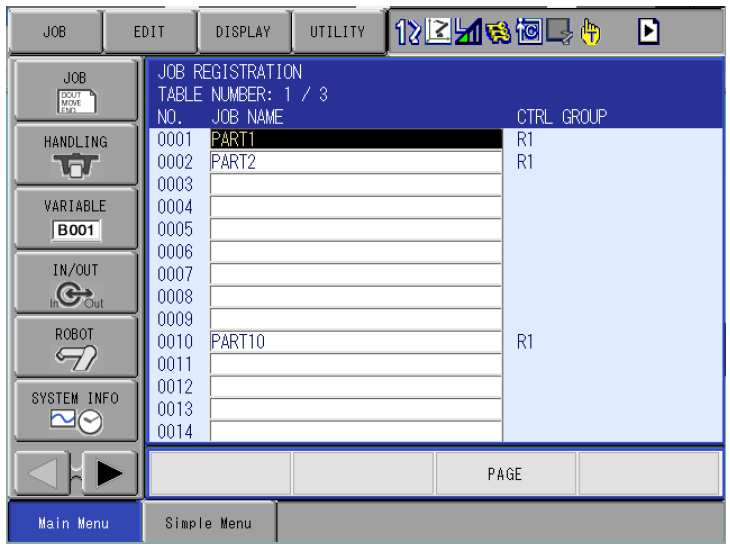
After setting this parameter, you can access the JET Tables under pendant menu JOB and then JOB REGISTRATION

Below is a screen shot of a sample Job Registration table number 1. (Select a different table using the PAGE soft key on the screen or PAGE button on the pendant.)
Use the arrow keys on the pendant to move up / down and left / right on the screen. If you select an entry in the JOB NAME column, you will be given the options of “SETTING JOB” to add one of your job names in the table or “CANCEL JOB” to remove a name from the table.
Note the control group referenced by the job is shown on the right side of the screen. It may be convenient (but not necessary) when two or more robots are involved to use Table 1 for jobs exclusive to R1, Table 2 for R2 and Table 3 for R3.
Again, logic will need to be developed to prevent a call to an undefined JET entry. Calling an undefined JET entry will result in alarm 4619: “UNDEFINED JOB ENTRY TABLE”. The sub code will indicate which entry was called.
Comments
0 comments
Please sign in to leave a comment.